Cladding

Welcome to the cladding mega-page! This is best bit and where you can really put your stamp on your garden room. Practically every photo on this page is from a self-builder just like you. I’ve made this page to cater for garden rooms and outbuildings but it’s a good starting place for cladding a house too.

Left: Before you clad, you need to get your battens right. A big decision is also whether to orientate your cladding horizontally or vertically which I cover in detail in this video.

Right: A quick intro video to this page.

TIMBER CLADDING

Foreword: With timber cladding things can get complicated as there are more than one species in a genus. For example, both Siberian and Douglas Larch are used as cladding. Additionally, climate impacts tree growth so the same species can look quite different depending on where in the world it was harvested.  Furthermore, each tree is individual and batches vary too so even if you’re set on a particular type of timber, I’d recommend getting samples or going  to your supplier in person before purchase. The durability figures are without oil or stain protection, so will last longer if you stay on top of the upkeep.

Western Red Cedar

As I write in 2021, western red cedar is by far the most commonly used cladding material for garden rooms and where I feel this page should kick-off. It’s a beautiful cladding material with high durability and I used it on the front of my build. However, like with all trends, they come and go and I think we’re now at peak cedar where many garden rooms are starting to look the same and when that happens, people want to diverge from the norm and stamp their own individuality, especially so for self-builders. The great news is that there are so many alternative cladding options to choose from as this page will hopefully demonstrate. You may well  end up coming back to cedar but at least it will be a conscious choice, rather than the default.

North American Western Red Cedar

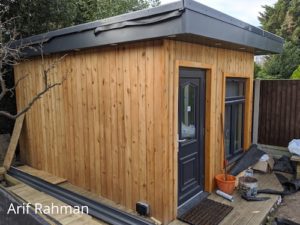
Sp. Thuja Plicata. Sourced from its native Pacific coast of North America (US & Canada) where cold winters hinder the speed of the trees’ growth resulting in tight growth rings (denser) and few knots. The wood produces natural oils that make it the most durable and stable of softwoods and can last well in excess of 50 years if cared for well. However those same oil react with ferrous metals so stainless steel fixings are required, again adding to the cost but on the plus side, the wood is non-resinous, so no oozing of sap will occur.

Unlike other timbers such as larch, its dimensional stability allows for secret fixing through the tongue of the boards which creates a cleaner finish. To do this you’ll almost certainly want to use a second-fix (brad/pin) nailer which again increases the cost, whether you buy or hire.

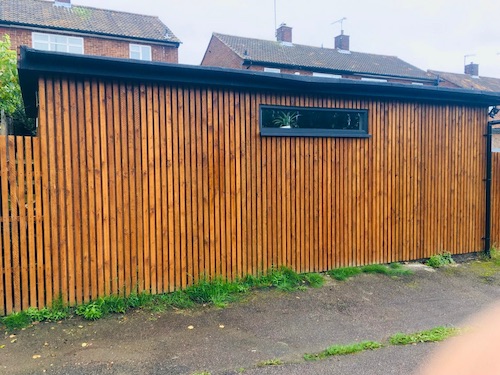
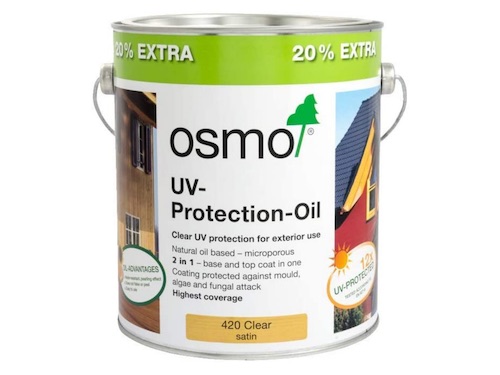
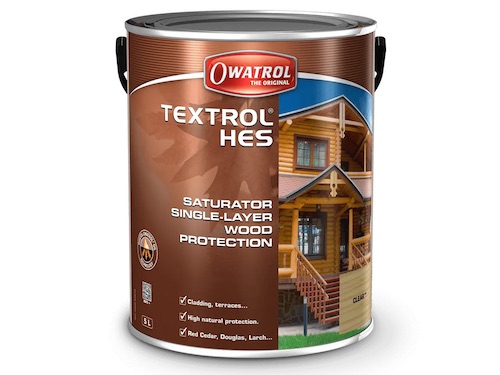
Colour ranges from light yellowy pink (outer sapwood) through to richer tones of red and dark brown (central heartwood), even from the same batch, giving a varied appearance. To keep the wood looking this way a UV oil will need to be applied every few years.

Graded into ‘No. 2 & better’ and ‘No. 4 Clear’. These refer to the number of knots with the latter being the higher, more expensive grade. In the UK, it’s common for the two to be blended to produce a grade called ‘No. 2 & better/15% 4ths’. 

Takes stains and oils well.

British Red Cedar

Showing british red cedar cladding on garden room

The same species as above but grown locally here in the UK. Our milder conditions result in a paler, more consistent pink to amber colour but with more frequent dark knots. It looks a bit like a pink-ish larch.

Given the reduced transport costs, quicker growth and lower desirability, you can get the pinkish hue of cedar and longevity without the high costs.

Due to the number of knots there is no true grading system but suppliers may have their own. Here’s a good British vs North American red cedar comparison video.

Larch

Siberian Larch

Sp. Larix siberica. Often in second place to cedar, this more knotty (smaller and fewer than pine though), yellowy wood is sourced from Russia and Scandinavia. The knots are a lighter grey than its European larch counterpart and the grain more visible, more akin to pine than cedar. It produces resin rather than oils so shouldn’t react with ferrous metals, but can ooze sap in its first year.

Takes stains and oils but less well than cedar. Its one of the hardest softwood available so its less vulnerable to denting. Because of this, it is significantly heavier than other timber. Expands and contracts so gaps should be left between planks (horizontal) and requires face fixing, so nail/screws will be visible.

showing UK grown larch cladding on garden room

UK-Grown Larch

Sp. Larix decidua or European larch. Cheaper than Siberian as it grows locally and quickly. The most distinguishing feature is more frequent and darker knots, a running theme of UK grown timber. A good comparison to Siberian can be found here

Where things get murky is when Siberian larch (saberica) is grown here and labelling gets confusing. Even Japanese larch (Larix kaemferi) is grown in the UK and used as cladding. Smaller, independent suppliers tend to be the clearest on the source of their timber claddings. As ever, make sure you are happy with what you are getting regardless of name.

showing iron clad larch cladding

Iron clad Larch

Larch pre-finished with ferrous (iron) sulphate treatment. This gives the larch a uniform look from the beginning and can be oiled over as usual. A little more understated but richer aesthetic. Arthur’s is the only one I’ve seen so far with with cladding but I’m rather smitten with it. Good for more rustic-style garden rooms or settings.

Pine & Spruce

Pine is a great choice for the more budget concious. It’s very cheap but incredibly versitile as it takes stains really well. Lee used shiplap pine and stained it with Ronseal Fence Life Plus.

In my Side Gate video I take a plain pine gate and stain and oil it to make it look like oak. Spruce tends to take stains less well compared with pine. 

Many people like the silvering effect that cladding goes under. I’m of the opinion that if that is what you want you may as well use pine rather than a more expensive timber as it will look much the same after the weather has taken its toll, though admittedly won’t last as long as silvered cedar for example.

Thermally modified timber

thermo redwood cladding on garden offuice

Generally pine or spruce, but deserving of its own class as the timber is treated at very high temperatures which change the colour from yellow to a brown/orange. This also modifies the structure of the cells of the wood making it much more durable and resistant to rot and insects while also slowing the silvering effect. 

Battens

But battens come before cladding right? Well they can be your cladding. If you’re running them vertically with a gap between each, I’d recommend using a black breathable membrane to really contrast and create a ‘shadow gap’. If horizontal then vertical battens first. Alternatively, you can have no gap and twist every other batten 90 degrees so you get a 3D effect. Then just stain and oil to your taste. Easy, cheap and I think it can look pretty great, certainly different. 

Pallet Wood

Varnished pallet wood cladding on garden room

You can’t beat free! If you can source the long types of pallets and pull them apart with something like this then you can clad your garden room for next to nothing, and you’ll get a workout at the same time. Or perhaps you have a small bit of wall either side of your doors, you can attach short pieces horizontally.

Mahen varnished his to get the colour to his liking and to protect the wood. Impressive!

Shou Sugi Ban

photo showing Shou sugi ban cladding

Shou sugi ban or ‘yugisaki’ is a technique originating from Japan of charring the outer layers of timber cladding for texture, colour and for longevity as the charred outer layers protect against rot and decay of the inner wood. 

It can be used on most timber species, cedar is typical though, and can either be bought pre-charred or you can try it yourself with a blow torch and decide for yourself if you want a deep charred effect or just to turn the surface black. Excellent for creating the black barn look.

Despite its increased durability, oil every few years for longevity. 

Other Timber Claddings

Timber cladding is an almost endless list so here are some other options to explore, which I’ll add in more detail when I have examples:

  • Douglas fir
  • Ash
  • Sycamore
  • Elm
  • Chestnut
  • Oak
  • Balau
  • Alder

NON-TIMBER CLADDING

As these claddings are non-organic, they last for a very long time and require practically no maintenance which makes them great for hard to access sides of a garden room or for a finish-and-forget DIYer. Durability is set at 50 years for most but your mileage may vary!

Composite

Composite simply means a mix of two or more materials so cement boards (below) can also fit into this category but the term is most commonly used for wood fibre + plastic composite which provides for a long lasting cladding. There are many styles available, a whole host of colours and you can decided between a wood grain effect or a smooth one so this is a great option for the front of a garden room if you don’t want to use timber or do any upkeep. Completely resistant to rot and decay, easy to cut and dimensionally stable. Composite decking is becoming more popular now for the same advantages it holds over timber. Both the plastic and wood is recycled so its reasonably environmentally friendly. Wide price range dependent on manufacturer and style. The one I used (Eurocell Coastline) was on the cheaper end of the scale.

Oils from the wood will wash out over the first few months of exposure so the cladding may fade in colour a little initially.

Decorative Cement Board

So I’ve kinda made up the name of this stuff to differentiate it from the cement boards that come in sheets.

Again a composite, but of cement and cellulose and synthetic fibres. You can get it in smooth or wood grain imprint in a wide variety of colours. From a distance it looks very similar to composite but it’s much heavier and requires a special blade to cut. The two main manufacturers are Marley Eternit (Cedral Lap or Click) and James Hardie (Hardie Plank). You get it in a lap weatherboard style or tongue and groove.

Very long lasting, no re-painting required, dimensionally stable and has fire-rated properties too. Wide price range dependant on manufacturer, style and thickness of board.

Sheet Cement Board

Exterior sheet cement board is a great option. In the video you can see that they render it but see ‘Render’ below for a product to skip the mesh step. My suggestion with this stuff would be either:

1) Use exterior joint compound to fill the screw holes, ‘tape and joint’ the joints, then paint the cement board directly with masonry paint or..
2) Same as 1) but use plastic T-trim to cover the joints.

Very durable with fire-rated properties.

Pircture of Eternit profile 6 cement board cladding

Another option in this category is sinusoidal (wavey) cement board. The type you’d commonly see on shed roofs. It comes in a variety of colours and has the benefit of being easy to overlap so you don’t have any gaps to worry about – much like metal sheeting.

Google ‘Eternit Profile 3’ or ‘6’.

Render

photo showing render carrier board
photo of white painted render on extension

Render looks good and would probably be your go-to if you built your garden room with blocks. It can be used on timber frame though by first installing a render carrier board. It’s a cement board but the front is covered with alkali-resistant mesh tape. Grab a roll of mesh to tape the joins and then render over. I watched my mum’s extension get built and definitely think rendering is a DIY-able job. Good if you want to match your building with your house. 

Paint the render any colour you like. It also makes the building appear to be more solid than it is. Very durable, dimensionally stable and has fire-rated properties.

Render carrier board can also be used to adhere brick slips to. 

PVC

photo showing UPVC cladding on garden room

If you like white, you’re in luck. As with all PVC, white is much cheaper (and more dimensionally stable) than other colours, like anthracite grey for example. So the range of prices of UPVC is rather broad. 

Lightweight, easy to cut and fix, very durable and zero maintenance. If you’re not interested in white, I’d probably opt for composite over PVC, as price is similar.


photo showing UPVC cladding on garden room

Brick Slips

picture showing Brick slips rainscreen cladding

They are what they sound like. Real bricks but cut to around 20mm thick to get the proper look of brick. They can be attached with a rainscreen type system as shown, or easier still is to attach render carrier board (see ‘Render’) and then cement to that. Finish off with cement between the slips for the full effect. 

Metal Sheeting

Highly durable, lightweight, looks great and not too hard to cut either. It’s a fantastic option either for unseen sides or for a more industrial look, often mixed with render or timber cladding. There are plenty of profiles to choose from including trapezoidal (box) and sinusoidal (wiggly). Comes in two thicknesses: 0.5mm and 0.7mm. For wall cladding purposes the 0.5mm thickness works well, with the 0.7mm often used as roofing material. I chose a type with a thin covering of PVC plastisol (lots of colour options) which acts to protect the steel behind. Longer walls, orientating it vertically is the easiest method. Requires fewer battens than other types of cladding. Barge boards can be used to finish off the corners. Has fire-rated properties.

Powder-Coated Aluminium

Photo of Powder coated aluminium cladding on garden room

I’ve only seen this one example by Naj and he had the sheets custom made. I’m a fan of combining exterior finishes but it’s a tricky feat to pull off on a single storey building but here it sets off the cedar just right.

Alumium is light and strong and the powder coating is available in many colours and in matt, satin and gloss sheens. 

Good thermal properties too!

Onduline

photo showing Onduline cladding on wall before erecting

Onduline is typically used as a cheap roofing material but can be used on exterior walls as well. Made with bitumen, it’s very easy to cut, shape and fix. It’s very lightweight which is ideal for attaching to walls before erection where access will be tricky. 

A good low cost alternative to metal sheeting but with a compromise on durability.

STYLES/PROFILES

Lap Weatherboard

This style falls under a variety of names like ‘lap siding or ‘feather edge’ but the point is that the boards overlap one another rather than using a tongue and groove connection and hence why it’s mostly used in the horizontal orientation to help shed rain water. 

In timber, the boards are usually pine or spruce but you can get other species that are more durable. For a chunky look, use treated 1×6″ boards which are sometime sknown as ‘sarking’ in Scotland, ‘Yorkshire boarding’ or ‘gravel boards’. Or instead use feather-edge boards which taper from thin to thick and are commonly used for fencing. I’ve used these before for my fencing project so you can follow that guide but just turn things around 90 degrees! Can be stained, painted or oiled to your taste.

Cement board and composite claddings also come in this style too.

Waney-Edge

photo showing Wayney live edge british cedar cladding on a garden room

Similar to lap-weathebroard but wider, less uniform and with a ‘live’ edge, often with bark. Start from the bottom and work upwards overlapping the planks for rainwater to run down the wall. You can find many timber species in this style such as larch and oak. The photo shows wayney-edge larch..

Board On Board

Always used vertically, this style involves two layers with the second covering the gap between the first, allowing for air flow behind the cladding and a interesting 3D effect. Sometimes called board and batten.

Tongue & Groove profiles

With timber in particular, there are hundreds of slight variations of tongue and groove profiles. Each supplier will offer different ones so to help narrow down your supplier, decide on the profile you want first. Here are a selection of the most common profiles:

Picture of the different cladding profiles available

OILS & FINISHES

For your timber cladding, you’ll likely want some protection, some colour or both. For cement board sheets or render, you want masonry paint.

UV Oils

UV oils are designed to keep your timber looking freshly cut by protecting against rain and the sun’s ray from silvering the cladding over time. They’re quite expensive but they give a lot of coverage. End result is a slightly wet, saturated appearance. Good for higher end claddings such as cedar or larch. It’s not worth spending big on cladding and then skimping on the oil. These three seem to be the best regarded out there.

OSMO UV oil

OSMO oil is the only one I can personally vouch for as I’ve been using it for years. It’s brilliant stuff.

Two coats are required. Allow the first to dry before applying the second. Depending on exposure (shade, rain cover) you’ll want to re-coat every 2-5 years. These top up coats are fast to apply. 

For the natural look, go for 420 Clear Satin, as this simply enhances the colour of the timber. If you want to add colour there are tinted versions such as 428 cedar. NOTE: Cedar and other tints are NOT made to be used on their respective timbers. Instead they mimic the colours of these timbers. So unless you want your cedar to be darker, use the 420 Clear, not 428 Cedar. Best price I’ve found is here.

photo of Treatex UV oil

Treatex UV oil

Same purpose as OSMO. But unlike OSMO, If you want to colour your timber you’ll need to apply one of Treatex’s tinted exterior oils first. Can be purchased here.

Textrol UV oil

Comes in a variety of tints including clear. Can be applied with only one coat. Can be purchased here.

SiOO:X

SiOO:X treatment on cedar cladding

Some people like the weathered look. For a house I can see the appeal as the vibrant colours of some timber claddings can look a bit gaudy; but for a garden room I like the pizazz of freshly cut timber. Each to their own though!

If timber is left to silver naturally with no protection then it can often be patchy as each side of a house gets different exposures to light and rain (rain actually causes a lot of the silvering effect). So SiOO:X can be used to accelerate the weathered look and get a more even finish, if indeed that is your thing. Available pre-applied from your supplier or apply it yourself to save £££.

You can read more about SiOO:X here.

Stains

Great for cheaper timber claddings to protect the wood and change the colour to your taste. Tend to be water-based so they can cover rough sawn timber as well as planed. Ronseal and Cuprinol are the market leaders in this space but of course there are cheaper fence stains that will do the job.

photo of Ronseal Fence Life Plus stain

Ronseal FenceLife Plus+

Why Plus and + ? I have no idea. See the colours available here.

Photo of Cuprinol ducksback stain

Cuprinol Ducksback

See the colours available here.

Masonry Paint

photo of Bedced Extra-flex elastomeric masonry paint

If you’ve built your garden room with blocks or you’ve attached cement/render carrier board to your timber building, you’ll need some masonry paint. Bedec Extra-flex is recommended due to it’s ability to stretch and therefore preventing cracking and water ingress. My mum’s extension was painted with this, as recommended by her builders. Time will tell how it holds up (completed 2020).

You can find the range here.

photo of white painted render on extension

NON-COMBUSTIBILITY

I’ve been purposely vague on this topic in the descriptions of each cladding. I don’t think I’ll be making a video on the requirement of non-combustibility for outbuildings over 15m2 within 1m of a boundary but instead will write everything I’ve learned about this topic here at a future date. To cut to the point: it’s complicated.

jump to...